mardi 15 mai 2018

See life in pink...

... or just put on pink glasses! ;-)


Hello everyone!
We have a new challenge at the Dream Factory! - This month's movie is

Nowhere in Africa 
Nirgendwo in Afrika 
Nulle part en Afrique

... animals, landscapes, people - everything that has to do with Africa is welcome!


I came up with that on this topic!


I drew the elephant and colored it with alcohol markers. Then I watercolorized - do not know if the word is right - the background and gradually added different fussy-cut and die-cut elements until I liked it!
Voilà, I think it's a fun card!


Thanks for your visit and
Happy crafting!


Linked up with:
Stempelgarten - Tiere
Crafty Friends - Animals
Allsort Challenge Blog - In The Pink
 . Stempelgarten News-Blog Grab our logo


Stamps: Flowers, leaves, sentiment and bird (Stampin'Up); Ice cream (Aladine); Elephant (hand drawn)
Inks: Daffodil Delight, Melon Mambo, Tranquil Tide (Stampin'Up); 
Dies: Stampin'Up
Alcohol markers, Felt-tip pens


lundi 14 mai 2018

Butterfly Wings


Hello everyone!
Can you imagine what you can do with butterfly wings? Me neither - at least not until yesterday!


Twofer's new challenge is about butterflies. 
You can use them as such or think of something completely different.


 I chose the latter and only used the wings!


The first card is a friendship card. 
To make the flowers I used the dies from Scrap Plaisir, you can see the set below. 
I colored the background with light blue watercolor. After drying I stamped stems, leaves (Scrap Plaisir) and sentiment (Stampin'Up). I colored the leaves with green Felt-tip pen and water.
Then I die cut a couple of butterfly wings for the flowers and colored them with pink Felt-tip pen and water. I pasted them on white paper, fussy cut it and glued it to the stems.
Finally I added three pearl pen dots near the sentiment and a faux stitching at the edges.


This card was in my head before I made the one with the flowers - hence the choice of butterfly wings - the only ones who allowed me to make a Christmas tree! 
I die cut the pair of wings twice from gold holographic adhesive paper and assembled them into a Christmas tree.
I stamped the Christmas word cloud in turquoise blue on a piece of white paper and stuck it, as well as the Christmas tree on the embossed sheet. To finish, I glued the panel on a turquoise card.


This is the set of butterfly wings of whitch I used the couple that you see on the closer view.


Have a Happy Day!


Linked up with:
Twofer Card Challenge - Butterflies
Christmas Card Throwdown - Turquoise and Gold (Second Card)
Time Out Challenges - Inspired by Words (First Card - Friend / Blossom for me)


First card:
Stamps: Stems and leaves (Scrap Plaisir); Sentiment (Stampin'Up); 
Dies: Butterflies (Scrap Plaisir)
Felt-tip pens and pearl pen

Second card:
Stamps: Word cloud  (Scrap Plaisir)
Dies: Butterflies (Scrap Plaisir)
Embossing: Stampin'Up
Gold holographic adhesive paper

dimanche 6 mai 2018

Monochrome....

... that was the challenge our Stampin'Up demonstrator gave us for the last swapp!

Hello everyone!
The title lets you guess what it's all about today!
The swapp took place in April but I have not published the pictures yet and when I saw the new challenge at Steckenpferdchen, I thought, ok, that fits!


....here they are!


... I made 15 pieces of it !! - The hardest part was punching and gluing all the tiny letters for the "Hello".....
But now from the beginning:
I started embossing the background with à linen cloth, then I stencilled with textured paste to make the pattern.
Next I die-cut the flowers, added Wink of Stella to the petals and stuck it to the card using foam pads. I also added a piece of gauze to each flower. I tore parchment paper into small strips and attached them with organza ribbon to the card. Then came the difficult part - gluing all the tiny die-cut letters! 😓....But also that had an end and I was really happy with the result! 
At the very end I put three small pearl pen dots in the upper right corner ....just for relaxing :))


Wink of Stella is so hard to photograph - here you can guess a hint of its sparkle!


Happy Sunday!


.....I found some more challenges for monochrome :))
Steckenpferdechen - Ganz in Weiss
Monochrome Magic - Monochrome
Ike's World - Monochrome
Unicorn - Monochrome

 Grab The Blog Badge! . Grab Our Badge!


Dies: Flower (Scrap Plaisir); Letters (Joy Crafts)
Stencil (Stampin'Up)
Wink of Stella, Pearl Pen, Parchement Paper, Organza Ribbon, Gauze


samedi 5 mai 2018

For Mom 💝


Hello everyone!
On May 13. is Mother's Day. - My card is ready to go ....yours too?!


Cute - isn't it!

I got the little hedgehog from my friend Gundi last year - a long time, I know - but today it was the right time to use it!
I heat embossed the sentiment in white on black cardstock and trimmed it into two pieces. - I wanted to have that, even without knowing how the card would look in the end! 
Then it was Hedgie's turn! I colored it with watercolor and cut it into a circle. I also cut off the lower part because I did not like the empty space. I layered with black cardstock and put it aside.
To create the background, I stamped tiny bubbles, flowers and leaves and added some watercolor. I stuck design paper to the bottom and trimmed the sheet with a wavy die cut. 
I glued the background first on mint green paper, then to the card. 
It remained to add Hedgie and the embossed words.  
.....and finally I completed with two little hearts on each side of the sentiment.

At first I was a little skeptical about the background but finally I like it. 


Have a nice weekend


Linked up with: 
Addicted To Stamps and More - Photo Inspiration (I was inspired by the flowers and the frames)
Happy Little Stampers - Watercolor 
Basteltraum - Muttertag / Blumen 


Stamps: Hedgehog (Whipper Snapper); Blooms, Leaves, Bubbles and Hearts (Stampin'Up); Sentiment (Mia's Stempelküche)
Inks: Pear Pizzazz, Melon Mambo, Daffodil Delight (Stampin'Up); Onyx Black (Versafine);
Dies: Action
... and Watercolors

mardi 1 mai 2018

Do you want popsicles?


Hello everyone!
We have a new challenge at House of Cards and this time we would like one shaped card! (see the inspiration photo below)


As you know you can only use the colors - or like me, combine both!


To color (with alcohol markers) more cleanly the different parts of the ice lolly, I cut it into three pieces. I stuck the colored  pieces on a piece of paper of the same size and embossed it to get the big furrows you see. - To emboss I had to trick and find something to make the furrows - by chance, I kept a plastic packaging that allowed me to do it!  👍👍
The stick is made from the inside of a packaging. I stamped the sentiments (Stampin'Up) and glued the popsicle on a card of the same shape. Finally I cut the "bitten corner" with a scallop shaped die.
Gönn dir was! - means something like - Treat yourself!


...and here is the inspiration photo
Shaped card and/or Colors


Looking forward to see your creations! Happy crafting!


lundi 30 avril 2018

A big carrot...


Hello everyone!
Do you remind our current challenge at the Dream Factory?

Peter Rabbit - Peter Hase - Pierre Lapin


Poor bunny, how desperately he pulls on his carrot!
I found this cute guy on Pinterest, copied it by hand and colored it with colored pencils and felt-tip pens. 
-- The original drawing: "Strong" by Monica Carnesi --
The sentiment is a mix from different Jillibean Soup stamps (with a handwritten "carrot") 😊


Inspired?? - you still have two weeks to join us!! It would be great to see your creations!
Happy crafting!


dimanche 29 avril 2018

Take a ride ....

....why not skate?

Hello everyone!


I made this card for my grandson's birthday and I really had fun doing it! 
At first I imagined a kind of ramp, that finally turned into a wall --- seen from the side! - But it allowed me to put the skater "behind" the wall!
Before embossing "the wall", I stamped it with splashes, arrows, the big B-DAY and the little Happy. After embossing I stamped scratches and sponged here and there with gray and beige ink to get a dirtier look.
The skater is colored with alcohol markers and then fussy cut. I colored the background with light blue watercolor and stenciled the sun rays with yellow and orange ink. I put all together and glued it first on black cardstock and then on a white card. The skater sticks on foam pads.

Thanks for reading and hope you like this little scene!


Linked up with:
Little Red Wagoon - Riding Along!
Stempelküche - Für Männer / Jungs


Stamps: Skater, Splash, Arrows, Scratches (Scrap Plaisir); B-DAY (Aladin); Happy (Stampin'Up)
Inks: Majestic Blue, Onyx Black (Versafine); Pumkin Pie, Daffodil Delight, Real Red, Shara Sand, Smoky Slate (Stampin'Up)
Embossing: Stampin'Up
Stencil: 13@rts

mardi 24 avril 2018

Cool Cats


Hello everyone!
.... in last minute - that I managed this card duo! Why a duo? Well, I just discovered Twofer Challenge, a card challenge blog of a new genre, that I really wanted to join in! - A completely new concept, because there must be two cards!
....but what am I talking about, look at it yourself and maybe you will like the concept too!


The requirement is pets. - I love cats, so I chose these cute velvet paws from Clearly Besotted Stamps.


The first card can be used for different occasions. 
It is was quite simple to design - although the small fish were not easy to cut!
I watercolored with felt-tip pens.


For the second card, it was another song! Stamping, masking, coloring, cutting ... in short, I spent a good part of my afternoon for this card and I am totally satisfied and in love with her !!
...Self-praise stinks but this time I like to accept it! hahaha
The cats, the gifts and the background are colored with alcohol markers. I first colored the Christmas tree with colored pencils, then with felt-tip pens and then I set accents with alcohol markers. The floor is stamped (Kaisercraft) and sponged with Sahara Sand (Stampin'Up). Unfortunately, I can not tell you from which manufacturer are the sentiments - I bought them at the flea market!


Have a Happy Day!


Stamps: Floor (Kaisercraft); Cats (Clearly Besotted Stamps); Christmas tree and gifts (Scrap Plaisir); Hot air balloon (Jillibean Soup); Sentiments (Unknown)
Inks: Onyx Black (Versafine)
Felt-tip pens, Alcohol Markers, Colored Pencils

vendredi 20 avril 2018

A Magical Day


Hello everyone!
Many many birthdays in the next few weeks - and there are also two challenges I want to join!
But to tell you the whole truth ....


... I just received my latest Stampin'Up stamps and I could not resist using them!


I also bought the corresponding dies with these stamps - this is much more practical - cutting with dies is much faster and cleaner than cutting with scissors!
I watercolored the background and then die cut small stars at top and bottom. 
While the paper was drying, I stamped and punched one unicorn and colored it with the same colors as those used for the background. I stamped two other unicorns and a few stars directly on the colored sheet and stuck glitter paper under the die cut stars. 
I trimmed the sheet with a wavy edge cutting die, added the sentiment, stuck the colored unicorn by using foam pads and pasted the sheet on a white base card.


Hope you have a magical day too!


Linked up with:
Challenge Up Your Life - Unicorns and/or Rainbows
Stempelküche - Fabelwesen


Stamps: Stampin'Up
Inks: Onyx Black (Versafine); Felt-tip pens
Dies: Stampin'Up


mardi 17 avril 2018

Let's be lazy 😉


Hello everyone!
Today we had really nice and sunny weather - it really smelled like summer!


... and it turns out, that I have something that goes perfectly with it!


I made this card already two weeks ago and for today, .....it fits like a glove!
The image (digi stamp) is colored with alcohol markers. I stamped,colored and cut out the sun and added it as well as the sentiment to my card. Voilà! 


Hope you have a lot of sunshine too!
See you soon :)


Stamps: Sun and Sentiment (Lora Bylora), the image is a digi
Inks: Onyx Black (Versafine), Alcohol Markers


lundi 16 avril 2018

Sunshine


Hello everyone!
The sun shines every day a bit more - so I decided to do a "sunshine" card ....logical!


Normally it should have been a one layer card, but ....it does not always happen as expected!


Actually, I colored the background of the daffodils in light green, but I did not like it at all! So I cut the picture right under the top flowers and put them on a card with a wide light blue colored stripe - like you see it here. ....this unexpected handling gave at the same time more volume to the card! I cut the word sunshine with a die, colored it in pale yellow and stuck it back in the cut area. -- Saved!!
...I colored with alcohol markers.


Thanks for your visit!


Linked up with:
Time Out Challenges - Spring ...(Daffodils on my card)
Happy Little Stampers - Anything Goes with Dies
Simply Create Too - Use Die Cuts
Stempelgarten - Frühling ...(Narzissen auf meiner Karte)

  Logo


Stamps (Stampin'Up)
Die: Stampin'Up
Alcohol markers


dimanche 15 avril 2018

Hop, hop, hop...


Hello everyone!
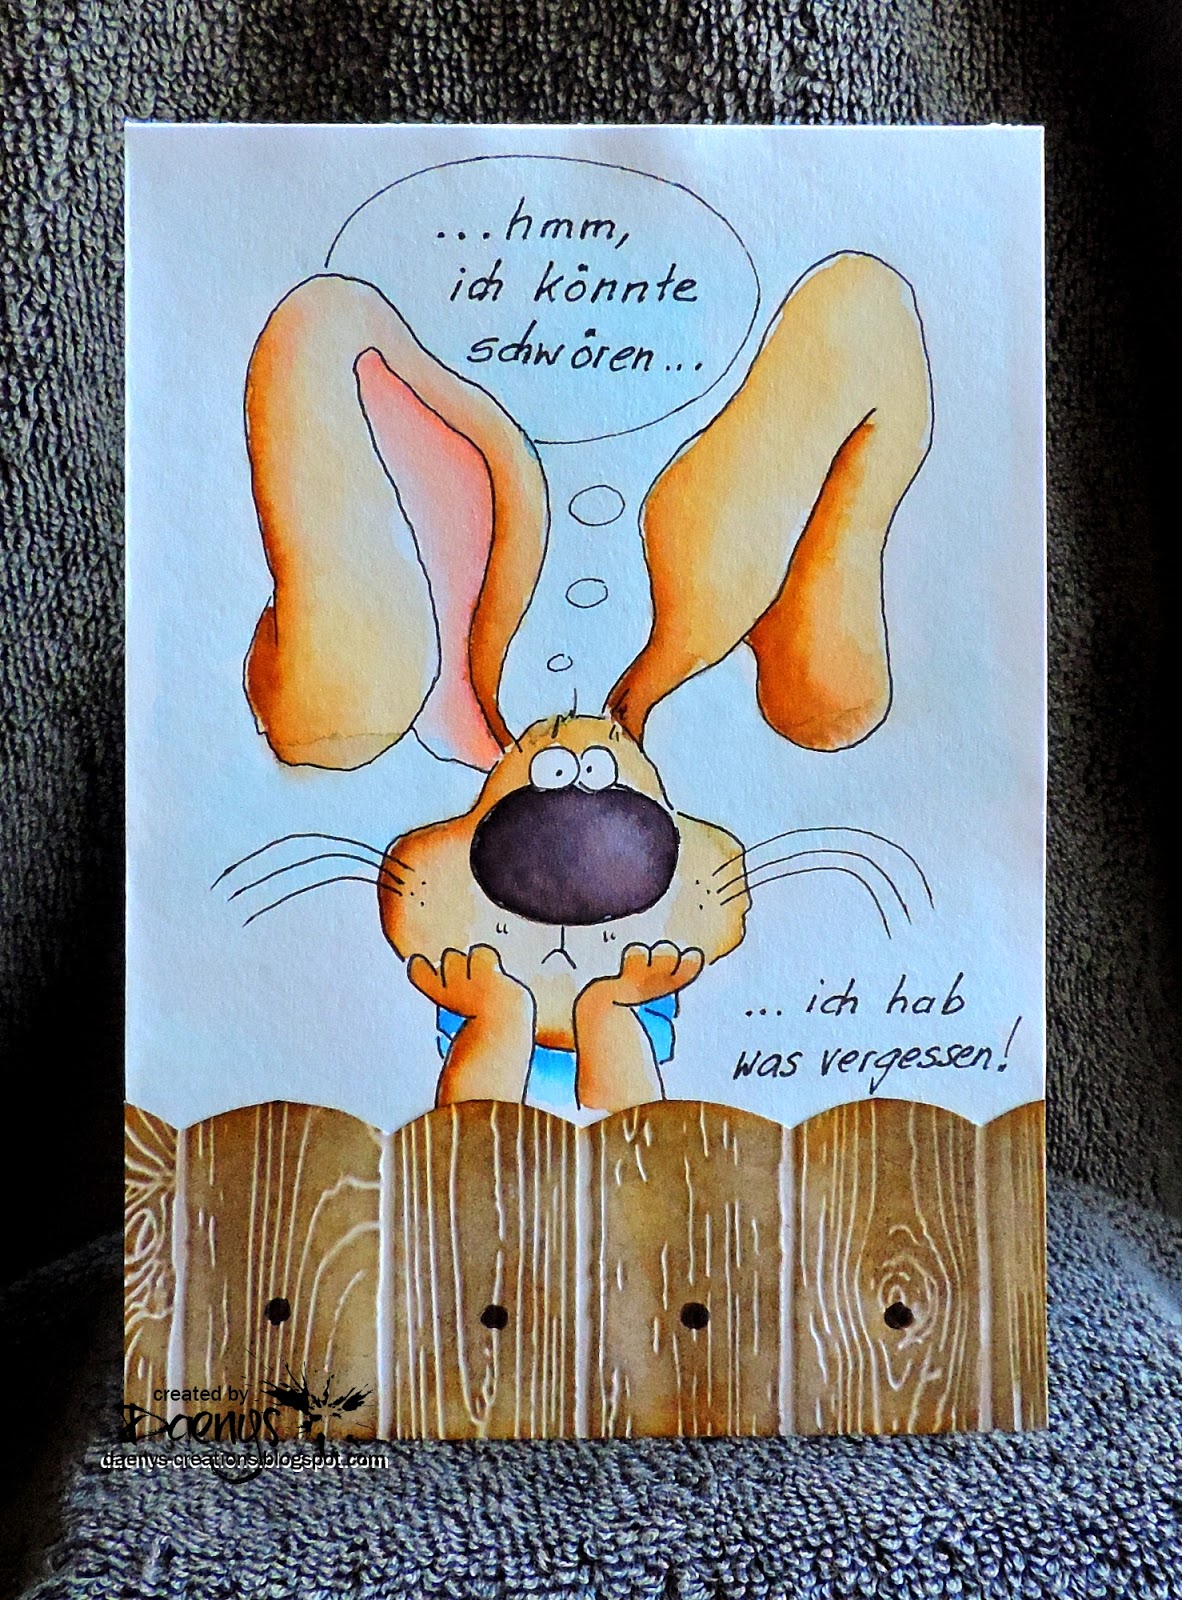
We have a new challenge at the Dream Factory! - This month's movie is

Peter Rabbit 
Peter Hase
Pierre Lapin

... I think you guessed what we are waiting for! 😉


Here is my bunny boy!
 ...a free clipart from Webweaver that I copied by hand and colored with felt-tip pens. 
The background is colored in light blue --- very light blue! ;)
The wooden fence is made of white cardstock and sponged after embossing (Stampin'Up)
I also added a speech bubble and text (handwritten). Voilà!

Text : .... hmm, I could swear ....
.... I forgot something!


Happy crafting! - Looking forward to see your creations!


samedi 14 avril 2018

Vive le vent d'hiver


Hello everyone.
How about a little Christmas card?
Cornelia's inspiration card at Muse Christmas Visions made me want to make one!


It was a bit difficult to make this card -- I really lack training for card making!! 😁😁
I colored and fussy-cut the little reindeer three times and I gave them different accessories for more fun. I put them in the snow hills (embossed and cut) and added some firs and the text. One of the firs is orned with pink pearl pen dots. The text says: Jingle bells...


Have a nice weekend


Linked up with:
Muse Christmas Visions - Muse Cornelia

                  Cornelia's card


Stamps: All Scrap Plaisir
Inks: Onyx Black (Versafine); Felt-tip pens
Embossing: Stampin'Up
Pearl pen


mardi 10 avril 2018

Spring!


Hello everybody!
.... no more packaging! - Today I have a spring card for you! ....super easy to do! 


I embossed the base card, stamped spring greetings on a large green stripe and glued it on the card. 
The gorgeous image is a digital stamp I got from my niece. I colored it with alcohol markers and layered it with green and white cardstock. - The white cardstock panel was cut with a faux stitching die.
Finally I stuck the image on the green stripe with foam pads. - That was it!


Thank you for your visit!


Stamps: Sentiment (Mia's Stempelküche)


lundi 9 avril 2018

Greenhouse


Hello everyone!
.... today I have a very original packaging for you!

I was looking for an idea to pack two pots with seeds - and found it here!
Unfortunately the site is closed, but the picture is pretty good to understand!

...and here is my interpretation of the mini greenhouse! 


The stamps are from Artemio - a birthday gift from a dear friend  ....she got this greenhouse from me! :))
The punches for the leaves are by Marianne Design and Joy Crafts.


The contents consist of two pots with seeds, cherry tomatoes and basil. 
Each potty got its lid so it looks a bit nicer!


See you soon!


Linked up with:
Steckenpferdchen - Verpackung


Stamps: Artemio
Inks: Stampin'Up
Embossing: Stampin'Up
Dies: Marianne Design and Joy Crafts
Cardstock and Acetat


dimanche 8 avril 2018

Easter packaging


Hello everyone!
....no card today, but a funny Easter box!


Although I had to convert some measures to fit the box to my needs but basically it is very easy to do! 
If you like it and want to do it too, here's the tutorial. - Maybe not necessarily for a bunny,  it can surely be adapted to other kinds of animals.

Happy crafting! 😉


Linked up with:

Steckenpferdchen - Verpackung


Stamps: Mia's Stempelküche (Sentiment); Stem and Flower (Stampin'Up)
Inks: Pear Pizzazz and Melon Mambo (Stampin'Up); Onyx Black (Versafine)
Dies: Ears and Paws (Sizzix); an office punch for the eyes
A bit of black wire for the whiskers 


samedi 7 avril 2018

Do not disturb


Hello everyone!
Oh dear, it's time to feed my blog! - Another week passed and I still have not found the right rhythm!


I originally planned this card for Easter .... but finally it became a card for Spring!


I found this lovely image on Deviantart - created by Katheairene
I copied the image by hand and colored it with my alcohol markers. - For the background I used a gold colored pencil. I cut it into a rectangle and added some faux stitches to the edges.
I put a strip of patterned paper to my base card and stuck the image by using foam pads.
The sentiment (Scrap Plaisir) says: "Do not disturb"


See you soon...


Linked up with:
Bastel-Traum - Ostern/Frühling


lundi 2 avril 2018

Snowdrops


Hello everyone!

Yes I know, all of my Easter cards are coming too late this year, but I've already warned the people in question! 😉

I used the weekend for crafting and here is one of my latecomers!


The snowdrops and the circles behind them are colored with alcohol markers. 
Before embossing the background,  I colored the circles and stamped the sentiment on it. 
I cut the snowdrops to a circle, sponged the edges with yellow ink and stuck it on the embossed sheet, which was then glued to a white base card. Voilà!


Linked up with:
Allsorts Challenge - New Beginnings   (Snowdrops are among the first flowers of the year) 
CASology - Cross   (crossed circles)
Stempelküche - Pastellfarben


Stamps: Sentiment (Stampin'Up); Snowdrops (Craft Sensations)
Inks: Versafine "Onyx Black" and Alcohol Markers
Embossing: Stampin'Up


dimanche 1 avril 2018

..... what's up with Rosi?

... surely you have thought about it!

Hello everybody!
....yes, I am still alive! - Sorry that you had to wait so long to see something new on my blog. Unfortunately, I have not had the slightest time for crafting in the last few weeks and so it happens, that I am going to continue directly with a new House of Cards challenge!

This month we have ...
CAS Floral Corner and / or Colors 
(see the inspiration photo below)


This card was very easy to do! 
I colored the image with my alcohol markers, cut it diagonally and stuck it on an embossed sheet.
 Then I put the set on a white card and added the sentiment. Finished!


HAPPY EASTER and see you soon! 
.......with plenty of floral corners 😉


Inspiration photo
CAS Floral Corner and / or Colors