mercredi 27 février 2019

So Happy....


Hello everyone!
During the last days I experimented with ink sprays and a lot of things went wrong! ...Throw away? Absolutely not! - The ugly ducklings were just set aside for another occasion...


Today I gave one of them a second chance and made this card with it.


My first idea was to leave the card as it was. - I just wanted to emboss the heart and stamp the text and grid on it, but I didn't like that at all! So I cut out the heart along the embossed line with scissors and put it on a black background. I liked that a bit better but I was still not satisfied! I made another try and this time I die cut the heart. - I got a heart and a thin edge!  
Finally I decided to keep both parts! I pushed them back and forth until this came out.
I added a few pearl pen dots and sponged two corners directly with a pink Distress Oxyde ink pad.

I like it - maybe you like it too!


......Just two more days and I'll tell you a little bit more about what's going to happen here! 😉


Linked up with:
Pile it on Challenge - Pretty in Pink 
International Art & Soul - Shades of any Color
Dragon Fly Dreams - Include a Heart

pile it on International Art & Soul
Dragonfly Dreams


Stamps: Sentiment (Craft Sensations); Grid (SU);
Dies: Heart (Scrap Plaisir)
Inks: Onyx Black (Versafine); Basi'Colors Rose Guimauve and Rouge Cerise (Scrap Plaisir); Pink Distress Oxyde 

lundi 25 février 2019

Snowdrops...


Hello everyone!
Unfortunately they're already faded, but I have held them on my card to give you a little joy today!


I stamped the snowdrops onto a piece of white cardstock and coloured them with alcohol markers. I cut a slightly larger piece of yellow cardstock to underlay the white one.
I marked the position of the panel on the card, colored two opposite corners with ice blue alcohol marker and stamped the grid. I did the same with the flower panel. At the corners of the yellow card I only stamped the grid. Finally I stuck the panels with foam pads on the card and added the sentiment.


Watch out, something new will happen here in the next few days! 
I'm really looking forward to it and hope that you will like it too. 
Can't tell you more now - stay tuned, just a few more days....! 
One thing is for sure, it will be colourful and funny! 😉


Have a great week, see you soon!


Linked up with:
Scribbles Designs - Three or more layers
Addicted to CAS - Grid 
Allsorts Challenge Blog - Spring Flowers

 Allsorts challenge blog  


Stamps: Snowdrops (Craft Sensations); Sentiment (Jillybean Soup); Grid (Scrap Plaisir)
Inks: Onyx Black (Versafine), Alcohol Markers
Dies: Craft Sensations

samedi 23 février 2019

Happy Birthday!


Hello everyone!
I played with my Basi'Colors today!
....I haven't experimented very much with these sprays yet but sometimes I manage to do something nice with them! This card was created during yesterday's attempt...


To get this shading, I sprayed water on a card and let it soak. Before I put "Rose Guimauve" ink on top of the card, I sprayed it again with water to make sure the ink flows well. Then I added a bit of Brusho and sprayed it with water again. After drying I splashed some red ink with a brush. Finally I added the sentiment.

Hope you like it...


Linked up with:
Less is More - One layer focus on sentiment
Seize the Birthday - Anything Birthday Goes
Krafty Chicks Challenge - Shades od Red and Pink

  DL.ART grab my button Krafty Chicks Challenge


Stamps: Action
Inks: Basi'Colors Rose Guimauve and Rouge Cerise (Scrap Plaisir); Brusho Rainbow Colors

RECYCLING


Hello everyone!
A new challenge begins at 52 Christmas Card Throwdown - I hope you'll play with us.
This week we have a technique/stash challenge and we want you to recycle something to create a new Christmas card!


For this card I used a very old Christmas label and I also got my hands on a piece of paper on which I experimented a bit with watercolours.... 


I backed the Christmas label with a small piece of the watercolored paper. The sentiment on the label is covered with a piece of cardstock on which I stamped a tiny ornament (Stampin'Up). 
I sponged design paper with Cloud White (Versamark) and glued it on a white base card. I added the label (foam pads) and the sentiment (Stampin'Up).
I don't know why the label design on this picture looks golden - actually it's silver....


Happy recycling!


Linked up with:
Friendship Challenge - Schneeflocken
Winter Wonderland - Anything Goes


Stamps: Sentiment and ornament (Stampin'Up);
Inks: Onyx Black (Versafine); Cloud White (Versamark);
Patternet paper, old Christmas label, watercolored paper, 


samedi 16 février 2019

Winter Trees


Hello everyone!
This week our theme at 52 Christmas Card Throwdown is

Winter Trees


I made a very simple card for this week's theme and played with the Basi'Colors again.
I wet the paper, dripped blue and pink ink and let it dry. I trimmed the colored paper into the necessary size and stamped an imaginative winter tree (Katzelkraft). I stuck the panel with adhesive foam pads and added the sentiment. (You can see another version here)

Have fun!


Stamps: Tree (Katzelkraft); Sentiment (Stampin'Up)
Inks: Rose Guimauve (Scrap plaisir); Smokey Gray (Versamagic); OST Blue Brusho

vendredi 15 février 2019

Stars


Hello everyone!
Could'nt resist to take part at the current Twoffer challenge - STARS.


Although I already showed one of the two cards this morning for another Challenge, I still dare to take part. 
I used the same die for both cards.


For the Christmas card I cut a piece of blue cardstock into the right size. I stamped the winter tree (Katzelkraft) with Versamark and heat embossed it with white embossing powder. Next I die cut the upper part with the star die and inserted this part to the panel again. I added some cut out stars on the top. The sentiment is from Stampin'Up. 


For the birthday card I wet the paper with water, dripped blue, yellow and pink ink on it and let the magic work. I cut the colored paper a little smaller than the card.
The magician (Stampin'Up) is colored with watercolors and die cut. I added a black panel at the bottom and stamped a sentiment from the same set as the magician with Cloud White (Versamark). For more "magic" I added the remaining stars from the first card.

Hope it will be okay for the challenge.


Linked up with:
Seize the Birthday - Anything Goes (The magician)
Winter Wonderland - Anything Goes (The winter tree)
Fun Friday Challenge - Die Cuts (The winter tree)
Color Crazy Craft Challenge - Anything Goes (The magician)


Stamps: Magician and sentiments of both cards (Stampin'Up); Wintertree (Katzelkraft)
Inks: Basi'Colors (Scrap Plaisir); Cloud White (Vesamark), Onyx Black (Versafine)
Dies: Magician (Stampin'Up); Stars (Action)

Magical Day


Hello everyone!
It's time for a new challenge at the Dream Factory! - This month's movie is

The crimes of Grindelwald
Grindelwalds Verbrechen 
Les crimes de Grindelwald

Keywords: Fantasy animals, magicians, magic and also Harry Potter.


In the last days I rediscovered my ink sprays and played a bit with them.
I wet the paper with water, dripped blue, yellow and pink ink on it and let the magic work.
 The magician (Stampin'Up) is watercolored and die cut. I added a black panel at the bottom and stamped a sentiment from the same set as the magician with Cloud White from Versamark. For more "magic" I've added some blue stars here and there.


Have fun and be enchanted by our challenge!


Linked up with:
As You Like It Challenge - Favourite Birthday or Christmas (I adore doing both but this time I needed a birthday card)


Stamps: Stampin'Up
Inks: Basi'Colors - Jaune Citron and Rose Guimauve (Scrap Plaisir), Blue Brusho  
Dies: Magician (Stampin'Up); Stars (Action)

lundi 11 février 2019

Gel Printing with Distress Oxide Inks


Hello, everyone.
Last Saturday, during a workshop I discovered Gel Printing and the Distress Oxide Inks - yes, I know they have been around for a long time.... 😏
To be honest, I'm not the one who experiments a lot - fortunately there are workshops for that!
We made a lot of prints with different colors and images but time was a bit short and I could only finish my card at home.


At first I was a bit hesitant and the first try went totally wrong, but slowly I had a better feeling and the prints got better and better! :)) - Saturday I had no idea how I would use these prints, but today was a good day.....! 
With the addition of the stamps the Gel-printed background looks very effective and I have to say that I really like the result! Let's see, maybe a new passion is awakening - I already ordered the Distress Oxide Inks! 😊


Linked up with:
Addicted To Stamps - Anything but a square
International Art & Soul - Make Your Own Background
Stamping Sensations - All things bright and BEAUtiful
The Library Challenge - The Note ( I was inspired by the cover)
Love To Create Challenge Blog - Anything Creative Mixed Media Goes

Our banner for your blog International Art & Soul Please grab our logo
The Note: The book everyone's talking about by [Folbigg, Zoë] Love to Create Challenge Blog...sponsored by Polkadoodles


Stamps: Car and water drops (Katzelkraft); Speedo (Tim Holts); Sentiments (Stampin'Up);
Inks: Distress Oxide inks (sorry, I don't remember the colors); Onyx Black (Versafine)
Gelli Plate and 

samedi 9 février 2019

Merry Christmas


Hello everyone!
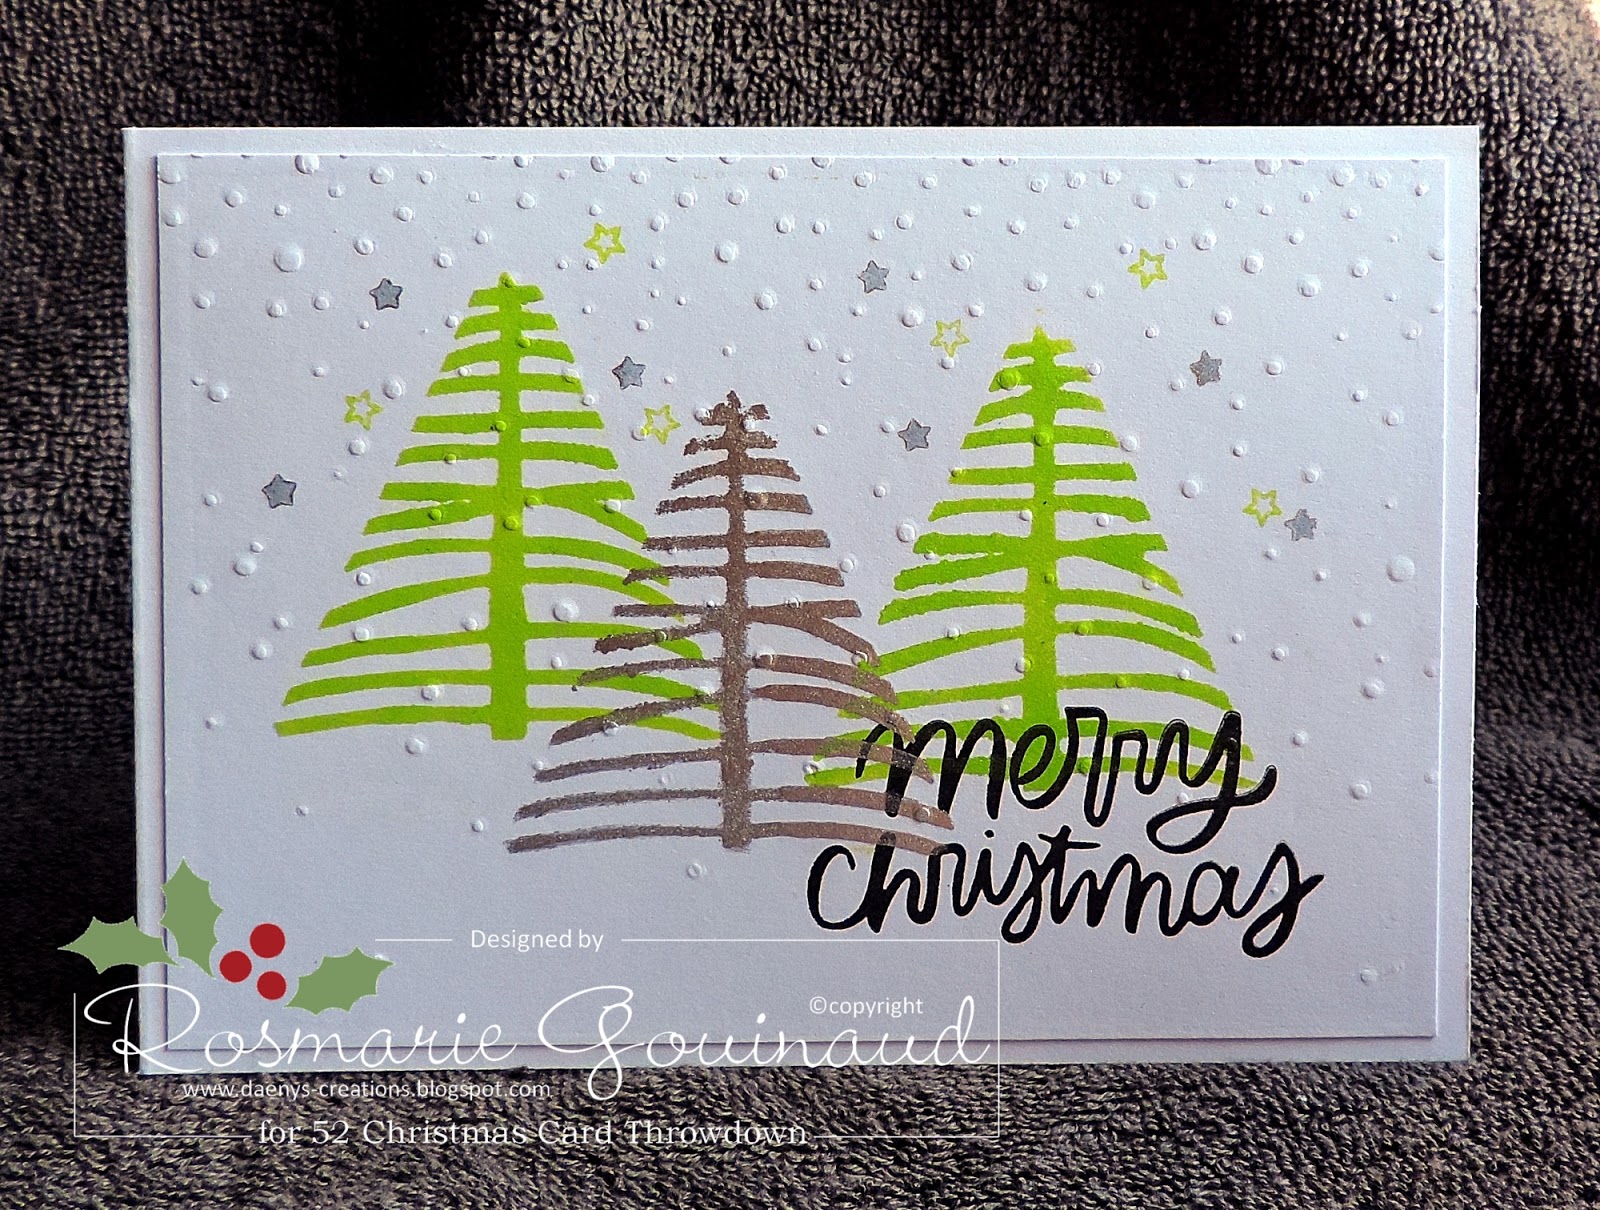
This week we have a color scheme at 52 Christmas Card Throwdown.

GREEN + SILVER


A very quick and easy card today!
I stencilled the firs, covered them with thin paper and embossed them. - I had to cover them because I used pigment inks. They dry very slowly and I didn't want to have any color on my embossing folder.
I then drove the card flat through the Cuttlebug, so that the embossing does not look too strong. - I liked it better that way! I added some stars and the sentiment and stuck this to a white card base. - As I said, quick and easy!!


Have fun with the colors!


Stamps: Sentiment and stars (LoraBy Lora);
Inks: Lime (Color Box); Silver (
Stencil: Scrap Plaisir
Embossing: Stampin'Up

samedi 2 février 2019

HO HO HO


Hello everyone!
It's Sketch time at 52 Christmas Card Throwdown!


I played with one of my Katzelkraft cats today! - It seems to have troubles with Christmas ^^....


Don't be worry, he looks a bit grim, but in reality it's a very nice guy! 😉
  
I glued black glitter foil on my base card to get the background. I die cut and dry embossed the frame and sponged it with Crumb Cake (SU). I also embossed the inside of the frame and colored it in light blue. The cat, the santa hat and the packages are colored with alcohol markers and then fussy cut. I used a very old stencils (Fiskars) for the HOHOHO 
- truly very old, I think I bought it when I started cardmaking in 2005! 


Have fun with the sketch!


Linked up with:
Crafty Friends - Animals/Birds
Craftyhazelnut's - Anything Goes as long as it's Christmas
Digi Design - Emboss it (Wet or Dry)
A Gem of a Challenge - Anything Goes
Catch The Bug - Anything Goes
Christmas Kickstart Challenge - Festive Felines


Stamps: Cat (Katzelkraft); Santa hat and packages (Scrap Plaisir);
Inks: Crumb Cake (Stampin'Up); Alcohol Markers
Dies: From Action
Embossing: Stampin'Up
Stencil: Fiskars
Black glitter foil

mercredi 30 janvier 2019

The best things in life are sweet!


Hello everyone!
A quick reminder for our current challenge at the Dream Factory - Charlie and the Chocolate Factory


I dry embossed a piece of white cardstock. Stamped tiny images on a second one and colored with felt-tip pens. Added faux stitching at the edges. I put blue cardstock between the two white parts and then backed all with brown and pink cardstock. Finally I added the tag. 
...love how it turned out!
...yes, I played with my watermark - wanted a new one! 😉

There are still two weeks to play - make it colourful and sweet!


Linked up with:
The Card Concept - Rainbow Cupcakes
Artist Inspirations - Anything Goes/Optional Theme Tag your it
Papercraft Challenges - Bright Colours


Stamps: All Stampin'Up
Embossing: Action
Felt pens, quilting wheel, paper cord

samedi 26 janvier 2019

Little Snowflakes...


Hello everyone!
It's the last week of the month at 52 Christmas Card Throwdown, which means that we have a Technique challenge for you....


...we'd like to see Heat Embossing on your cards.


First I heat embossed several snowflakes on a piece of white cardboard paper. I sprayed water over it and then spread watercolours in two different shades of blue on the wet paper. - The embossed aeras remain white. This technique is also called "Emboss Resist".
To make it flat again, I put an acrylic block  and a bottle of water on the paper and let it dry overnight.
Next day I die cut small stars from the panel and trimmed and backed it with a slightly wider light yellow paper. I wrapped some silver string around the panel and glued the label with the text on it. I added some Wink of Stella to the stars, to give them shine.
Finally, I glued the panel on the white card and added some half pearls.

ENJOY!!


Linked up with:
Paperminutes - Winterzauber
Cuttlebug Mania - Winter
Winter Wonderland - It's Snowtime
Your Next Stamp - Colors of Winter


Stamps: Snowflakes (Stampin'Up); Text (Kesi'art);
Inks: Bermuda Bay and Tempting Turquoise (Stampin'Up);
Dies: Stars (Scrap Plaisir); Rectangles (Action);
Silver string, half pearls

dimanche 20 janvier 2019

Welcome little one...


Hello everyone!
A friend asked me if I would like to make a card for her nephew's upcoming birth.


....I couldn't say no!


My friend had three wishes: 
a 3D teddy bear, not too much decoration and the word Congratulations.

I printed out the image several times and fussy cut the parts I needed to create the 3D image. The frame is die cut from white paper, dry embossed, sponged with blue ink and then glued with foam pads onto a larger white square. Underneath there is a layer of gauze, a punched strip of lace and a narrow blue organza ribbon. The light blue design paper in the background comes from a craft magazine. I sponged the edges with darker blue ink and stamped some hearts and sentiments. The final touch was 3 buttons and the Congratulations label.

I think I matched the challenge - my friend was thrilled with the outcome!


Linked up with:
Allsorts Challenge - Make it Masculine
Craft Friends Challenge - New Beginnings
Catch The Bug - Bingo (Button - Player's Choice - Ribbon)


Image: Tatty Teddy
Stamps: Sentiments (Katzelkraft); Hearts (Florilège design); 
Inks: Quite Navi (Stampin'Up);
Dies: Squares (Action); Buttons (Stampin'Up);
Punch: Stampin'Up
ribbon, gauze,

samedi 19 janvier 2019

Silent Night


Hello everyone!
Today is Saturday and we have a new challenge at 52 Christmas Card Throwdown!
Our challenge theme for this week is...

Silent Night.


When I saw our topic, I immediately thought of these beautiful watercolor Christmas cards from the past. I got some inspiration from Pinterest and then tried to capture my nostalgic thoughts on this hand-drawn card.

...and of course, I swapped my felt-tip pens for watercolors today!

I added a die cut branch that I also coloured with watercolour.
I cut a narrow strip of gold glitter paper with a serrated pair of scissors and stuck it on the right side of the card. -   
....looks a little torn like that!
The initial letters of the sentiment are painted with gold paint and then, like the roof of the church and the stars, embellished with Wink of Stella.


And now have fun with the challenge!


Linked up with:
Cute' N Crafty Christmas - Christmas/Winter

mardi 15 janvier 2019

Sweet Moments


Hello everyone!
First of all, I'd like to welcome all the new followers who have recently joined my blog - and of course also those who have been around for a while! -- Thank you for being here! <3


Well, we're already halfway through the month, and that means a new challenge at the Dream Factory! - This month's movie is...


Charlie and the Chocolate Factory
Charlie und die Schokoladenfabrik
Charlie et la Chocolaterie

Key words:  Sweets, fantasy, colorful, snow, England


There is not a lot of chocolate on my card except the chocolate cupcake, 
but it is very colorful and appetizing! 😋
The cupcakes are fussy cut and watercolored with felt-tip pens. 
I added some faux stitches with a quilting wheel along the edges.


Have much fun with this challenge 
....but do not salivate too much otherwise there will be spots!  😁


Stamps: Action
Inks: Onyx Black (Vesafine); Melon Mambo for the hearts (Stampin'Up);
Quilting wheel


samedi 12 janvier 2019

Let it Snow ☃☃☃


Hello everyone!
Today is Saturday and that means 52CCT day! - Our theme for this week is Purple and Green.


At first I wanted to do the card with a star embossed background but I thought that it would be too many stars. 
I picked up another sheet of cardstock and made criss-cross lines with a bone folder  ....and I liked that much better!
Snowman, deer and fir are from Scrap Plaisir and watercolored with felt-tip pens. 
Stars and snowflakes are from SU. 
The sentiment is cut from strong white cardstock and colored with black and purple alcohol markers. - I got the die from my friend Bettina at Christmas. 
I added a bit glitter with Wink of Stella to the snowman and to the snowflakes.

Have fun!


Linked up with:
Christmas Crafts All Year Round - Let it snow
Creatalicious Challenge - Anything Goes with optional something new ( a new die for me)
Creative Craft Cottage - Winter


Stamps: Snowman, Deer and Fir (Scrap Plaisir); Snowflakes and Stars (SU);
Inks: Tranquil Tide, Pear Pizzazz (SU); Alcohol Markers, Felt-tip pens
Dies: a gift from a fried
Wink of Stella

lundi 7 janvier 2019

Diamond Box


Hello everyone!
A few months ago I made this diamond box and oups,
..... I almost forgot to show it!


I never made this kind of box before and it was not that difficult. 
If everything is clean and well cut, there is no problem to make the box without the Envelope Punchboard!


If you also want to make such a box, here is a very good video tutorial in English 
and here a very detailed step by step tutorial in German.

Have fun with  BOX-ing ;)


Stamps: Stampin'Up
Inks: Tranquil Tide (SU)
Dies: Butterflies and leaves (SU); Squares (Action) - I used them also for the triangles
Patterned paper, ribbon, 

samedi 5 janvier 2019

Christmas Wishes in a box + Tutorial


Hello everybody!
First of all, I wish you all the best for 2019! .... especially health and creativity !!
I hope you all had wonderful Christmas and New Year holidays!

I also want to be a bit more creative this year, because the last few years were reserved almost exclusively for a house construction! - Now it's done! ...And that's why I applied to 52CCT and joined the design team.
This means that from now on and throughout the year you will see a lot more Christmas cards on my blog - more precisely, one each saturday! I hope you like these cards as much as I do and I am delighted that I can show you the first one today!


Here we go!


We start with the sketch you can see on the design below.

Although I tend to clean & simple creations, I really enjoyed making this card! 
I used two sets of stamps from Scrap Plaisir and the corresponding dies. After I colored (Alcohol Markers) and die cut the individual images, I started making the foldable card.


January Sketch at 52CCT


When the card was done and all these nice little images were stuck on it, I added a narrow orange ribbon.

The card measures 12 x 12 x 1,5 cm when unfolded (...a little bit more with the embellishments), and 13,5 x 15 cm when flat. The concept is a bit like a mini pizza box, except that the flaps are just only on the side with the window so that the box can be folded.
It consists of four parts: the green box, a red frame, the white sheet with the sentiment for the background 


...and a support so that it stands well.
 -The ribbon stuck on the sides, so it does not bother when folding the card.


This is how the card looks flattened.


And because I am a very nice girl 😊, I made a tutorial for you!

...you just have to follow the instructions below ;) 


Please click to enlarge!

Please click to enlarge!


Thank you for your visit and have fun!


Linked up with:
Crimbo Crackers - Anything Goes (must be Christmas or Festive related)
ABC Christmas Challenge - A for Anything Goes 
Stempelküche - Alles geht 
Papercraft Challenges - Merry Christmas


Stamps: Scrap Plaisir
Inks: Onyx Black (Versafine); Alcohol Markers
Dies: Scrap Plaisir
Gold glitter paper, ribbon, patterned paper, Wink of Stella


mercredi 26 décembre 2018

For my Sistah...


Hello everyone!
Oh dear! Time has gone so fast ....!
I hope you all had a wonderful Christmas Eve and that all of you have received many gifts from Santa Claus! 😉


Here is my last birthday card for this year!


My sister turned 55 yesterday and I made this card for her.
I used the leftover panel from which I cut the letters for the card of this post. I copied the letters onto a second piece of paper, then pressed different ink pads onto an acrylic block, which I then pressed onto the letters on the second panel.
I adjusted the part with the cut out to the colored letters, and inserted a black, glittering paper border on both sides.
Then I took a third piece of paper (a little smaller than the finished card) and stamped small balloons on it. - I watercolored them with the respective colors that I used for the letters. 
Before glueing the different panels on it, I colored the edges of the white card base with black felt-tip pen. I stamped the birthday sentiment and added a die-cut balloon.


Thanks for your visit.


Linked up with:
A Gem of a Challenge - Anything Goes
Color My Heart - Bold and Bright


Stamps: Balloons (Action), Birthday (Penny store)
Inks: Melon Mambo, Bermuda Bay, Pumkin Pie, Daffodil Delight, Pear Pizzazz (Stampin'Up): 
Dies: Action
Black glitter paper, Felt-tip pen, Twine

dimanche 23 décembre 2018

Happy Birthday


Hello everyone!
We have another birthday to celebrate!
This time it's Timeo's turn (my nephew's son) - he'll blow 6 candles tomorrow!


This is the card I made for him.


I bought some new dies at Action a few days ago and couldn't wait to try them. For this card I choose the HAPPY die. I used the letters - the remained panel is on the card that I'll show you tomorrow.
I used different stamps and ink pads to color the letters and glued them on a strip of acetat. 
I cut a part of the card and replaced it with the acetate. The visible part through the acetate is stamped with water droplets in gray ink. - BIRTHDAY is also stamped in grey.
After that I stamped the critters on the card and watercolored them with felt-tip pens. 
The orange balloon is added with a home made stencil. 
At last I added some pearl pen dots here and there.


Thanks for your visit!


Linked up with:
A Gem of a Challenge - Anything Goes
Color My Heart - Bold and Bright
Double Trouble Paper Crafting - 3,2,1 Recipe 


Stamps: Critters and water droplets (Stampin'Up); the green balloon (Action); 
Inks: Smokey Slate, Pumkin Pie, Crumb Cake, Pear Pizzazz, Melon Mambo, Bermuda Bay, Early Espresso (Stampin'Up); Onyx Black (Versafine)
Dies: Action
Pearl pens